
LAB homework-4
Updated: Nov 2, 2020
VR interaction
In this lab we will implement the VR interaction of the roll-a-ball. We have already implemented for Windows and Mobile. In this work I use Oculus Quest. This HMD works only in Windows not in Linux.
First of all let us enable developer mode in the Quest. We can follow the tutorial here in order to enable it. Install OculusSetup in Windows and enable Oculus link like below.

Now let us setup unity. We download VRTK 4 from the GitHub page here. VRTK is a Virtual Reality Toolkit, in which we can find a Farm Yard example.
After we download the VRTK, ADD it into our unity project. Then Open it and go to Edit > Project Setting > Player > XR Settings and tick Virtual Reality Supported under Depreciated Settings. Then lets chose our platform, which is Android for the Oculus Quest. Also go to the Assets Store at https://assetstore.unity.com/ and download Oculus Integration, its FREE and import it into our project.
Make sure you have already exported roll-a-ball project that you have implemented for the mobile as a ".unitypackage".
Now lets import our roll-a-ball into the VRTK. The process is simple. We must go to the Assets > Import Package > Custom Package and import it.
NOTE THAT:
We will get errors soon after import our roll-a-ball game. We will just rename our PlayerController.cs to PlayerControllerRAB.cs and comment the following parts of the code. This error originate because we dont use UnityEngine.InputSystem in this implementation and also name error because in the VRTK there is already a PlayerController.cs

Let us use the Unity Assets Store in order to redesign our roll-a-ball application for the VR environment. We can get the best assets to make cool video games from the assets stores.
Visit asset store and search for your favorite assets, such as room, furniture etc. Whenever you download things from the store, please make sure to tick 3D and free, so that all the free assets will be displayed. Otherwise you have to pay!
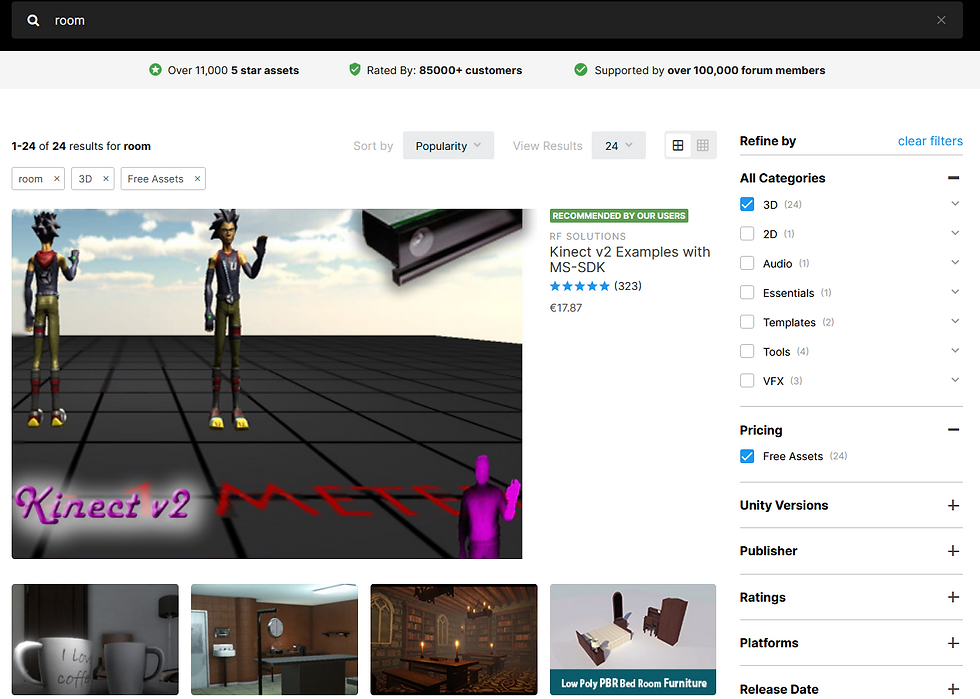
After you download things from the assets stores, it will appear in assets under your project. For example, like below.

I use this assets to create a room like scenario with a sofa, table etc for my game. The below image shows the scene of my game.
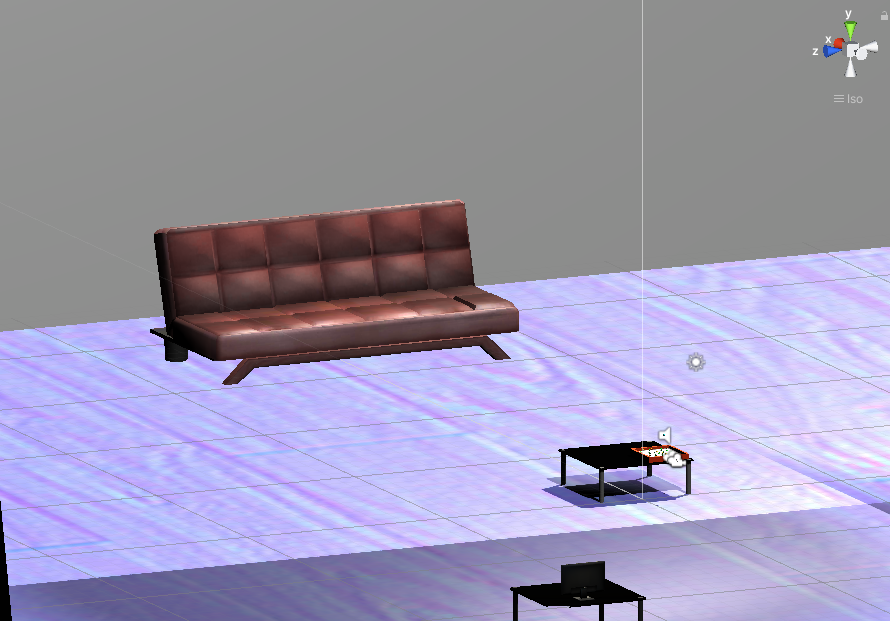
Once you setup the room, it is good to go for the next step of making the VR version of the roll-a-ball.
REMEMBER TO DELETE THE CAMERA. I FIRST FORGOT TO DELETE IT AND HAD A HARD TIME. :'(

We create an empty game object called Environment to put all the non-interactable object in the game, such as table, walls, floor etc. Also enable Oculus Link.
We will create another empty game object and rename it as Roll-a-ball and put the Player, Walls, PickUpYellowParents, PickUpGreenParents, Directional Light etc. Modify the scene geometry/scale according to your wish. Make sure to add the Box Collider to the Roll-a-ball game object.
NOTE THAT: We must add layers in order to avoid the empty game object collide with the Player. So how do we do this?
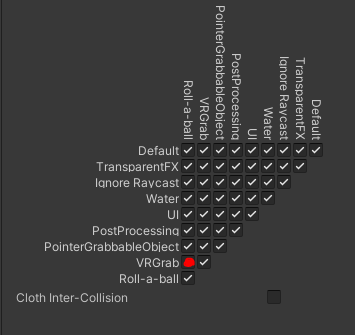
Go to inspect of windows of Player and Roll-a-ball and add layer of name as "Roll-a-ball" and "VRGrab" respectively. Then go to Edit > Project Settings > Physics > layer collision matrix and un-tick the red box like in the left-hand-side figure.
Lets setup now VRTK. Add OVRCameraRig to the scene. It can be found in Project > Oculus > VR > Prefabs > OVRCameraRig
In the OVRCameraRig, go to Tracking Origin Type and select Eye Level. I tried with the Floor Level but it didn't work well for my scene.

Now add a component called Linked Alias Association Collection in the OVRCameraRig.
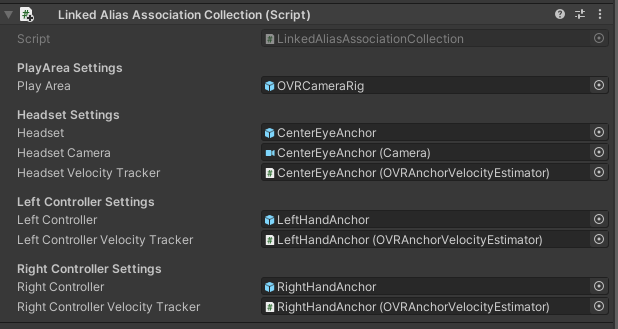
Make sure the followings are selected from the drop-down menu.
Go to Project > Oculus > VR > Prefabs > OVRControllerPrefab and add "OVRControllerPrefab" in the Hierarchy as a child of LeftHandAnchor and RightHandAnchor
In the OVRControllerPrefab make sure R Touch and L Touch are set accordingly in Controller. Go to Project > Packages > VRTK Prefabs > CameraRig > TrackedAlias and add TrackedAlias to the scene. Now in the TrackedAlias set the following parameter as follow.

Now go to Project > Packages > VRTK Prefabs > Interactions > Interactors > Interactor

Add Interactor as a child to the Left Controller Alias and Right Controller Alias in the TrackedAlias.
Create an empty game object and rename it to LeftTriggerAxis and a add component called Unity Axis 1D Action. Now go to Project Settings > Input Manager. Find VRTK_Axis9_LeftTrigger and copy the name of VRTK_Axis9_LeftTrigger and paste it to the Axis Name of LeftTriggerAxis.
Create another empty game object in the scene and rename it to LeftTriggerPressed. Add component Float To Boolean and Boolean Action. Set the parameters as follow for the LeftTriggerAxis and LeftTriggerPressed;

Duplicate LeftTriggerAxis and LeftTriggerPressed to create the Right version (RightTriggerAxis and RightTriggerPressed).
In the Interactor (LeftController/RightController) set the parameter as follow;
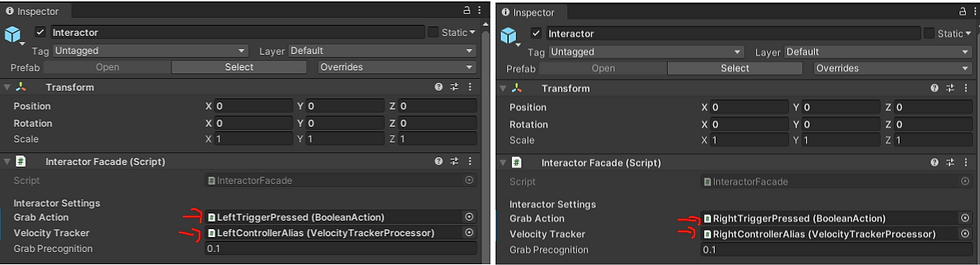
Now let us add Interactable to the scene. Go to Project > Packages > VRTK Prefabs > Interactions > Interactables > Interactable.Primary_Grab.Secondary_Swap and drag and drop Interactable.Primary_Grab.Secondary_Swap into the scene.
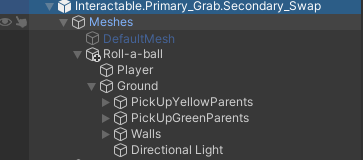
Now under the Interactable.Primary_Grab.Secondary_Swap, disable DefaultMesh. Drag the Roll-a-ball as a Child of Meshes.
Now create a script called OVRAnchorVelocityEstimator.cs. You can find the script here.
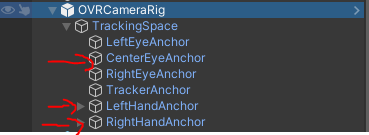
Add this script to CenterEyeAnchor, LeftHand Anchor, RightHand Anchor.
Now set the references as follow.

and

Great!! Now you can test the VRTK and controller. ;)
Please look at my testing video below of Roll-a-ball in the VR environment. If you touch the Orange cubes you will lose the points :D. You have to pick all the Green cubes.
References:

Comments