
LAB homework-2
Updated: Oct 31, 2020
LAB C/D: Build your first Unity 3D Application.
In this tutorial we are going to build an interesting Unity project called "Roll-a-ball". This is a very primitive project that helps us to delve into the realm of the Unity game engine. The purpose of the game is to roll a ball around a well defined region of space and collect all the available items in it. If you collect a sufficient number of items, you will WIN!!
So first of all, let's create a new Unity project. A typical interface of the Unity hub is like below. You can choose a templates of Universal Render Pipeline (URP) or 3D. In this tutorial I will choose a 3D template.

Next to the Templates you will find "Setting" where you can specify the location of your project and the name of the project.
The opening windows will look like below. Where we can create our first GameObject. In our case, let us create a plane. Go to Hierarchy(+) > 3D Object > Plane like explained in the below figure.
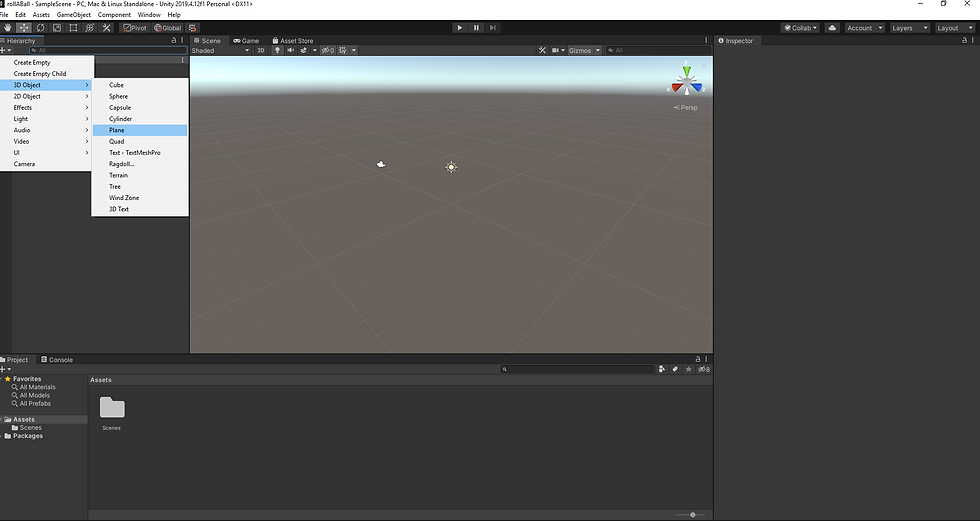
Once you create a GameObject, it is always a good idea to name it, so that it will be easy for us to recall the GameObject in the scene. Lets name it as Ground. You can simply right click and rename it or you can change the default name of the GameObject from the Inspector panel.
By default, the Unity game engine places any object at (0, 0, 0). If you wish you can change the coordinates or change the scale or the rotation of the object. In this roll-a-ball example, lets us set the scale of (2,1,2) along the x, y and z axis.
Now it is time to create our Player. ;-) We are not going to create something like a complex hyper-dimensional object :D, but a simple sphere. Again the process is the same. Go to Hierarchy(+) > 3D Object > Sphere. And as I mentioned before the default location of the sphere is at (0, 0, 0). Great!! Remember the y-axis is "upward" and the x-axis & y-axis are on the plane that we have created. Lets put the sphere just above the Ground, so that it will be visible to us rather the the submerged position. Hence set y = 0.5 while keeping x=z=0.

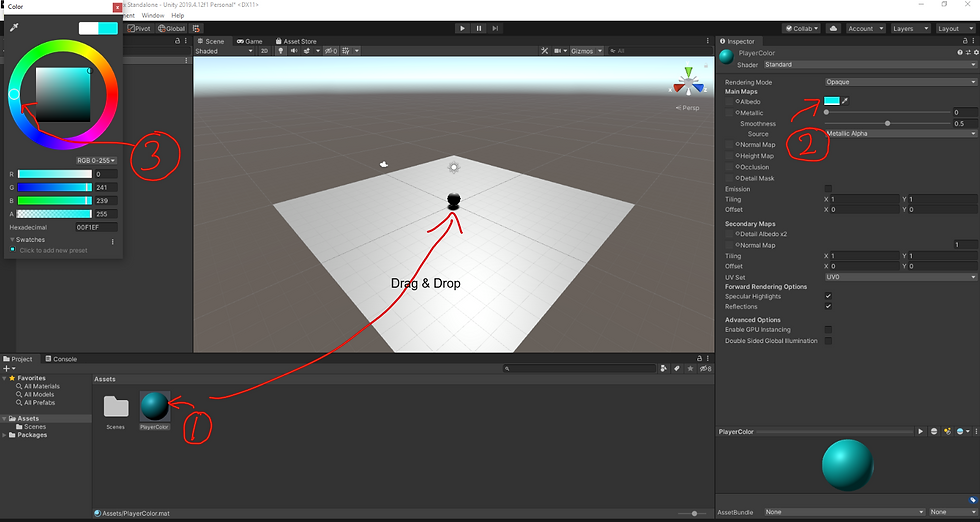
Now its time to choose your favorite colors for different GameObject!! The process is super simple. If you want to set a color for the DirectionalLight, just click on the DirectionalLight from the left panel and then under the "Light", you can choose the color of your choise as well as the rotation of the DirectionalLight can be set as well. I would like to keep here normal white light and set the rotation of the light source to (50, 50, 50). Now to change the color of the sphere, simply right click on the assets panel > Create > Material. It will create a icon in the assets panel. Now rename it to PlayerColor. If you want to change the default PlayerColor, you can simply click on it and in the inspector panel go to Albedo and choose a color of your choice and drag & drop the PlayerColor to the Player. The figure below shows a step by step procedures to complete the task. If you wish you can change the metallic and the smoothness property from the inspector panel.
Unity Package Manager window ( you can access via Window > Package Manager) is a useful place to find packages that are available for installation or already installed in your project. In our project, we will install Input System 1.0.0. First in the Package Manager, go to Advanced and tick the Preview Package Manager. This is a good practice as it will show us all the preview. Now search Input System 1.0.0 from the search bar and install it. After installing, a warning sign will appear, just press "YES". This will enable the back-ends.
Let's add a player input component!! First of all, select the Player GameObject and in the inspector window there is a place to "Add Component". In the search bar type Player Input and add that. In the Project area, under the Assets create a folder called "Input" and save as InputActions. Even though, we wont be able to move the Player immediately, we will have access to the information about control devices, such as the player's keyboard.
PC, Mac & Linux Standalone build settings
We are going to build the roll-a-ball game for the Windows machine and for the architecture of x86_64. Firstly go to File > Build Settings. You will be prompted to a window like below. Choose the appropriate platform and the architecture.

NOTE: You might face a possible build error!! if you face such error, you must install Visual Studio 2017and Win 10 SDK.
Now let us add a rigid body component to the object. A rigid body can be applied to any object that has mass. If we put a rigid body component to an object, all the laws of classical physics can be applied to that body such as the equation of motion, gravitational attraction etc. You can collapse and expand the component view as you want.
Now let's create a C# Script to control the player. Before we create a script using C#, let us create a folder in Assets called "Scripts", so that we can put all the scripts in it. It keeps all our scripts more organized. Okay now time to write some codes!! Create a script called PlayerController. We will use visual studio. The process is as follow;
Right Click on the Assets > Scripts, and follow the screen shot as below.

A typical interface of the of the C# script of the PlayerController as below.
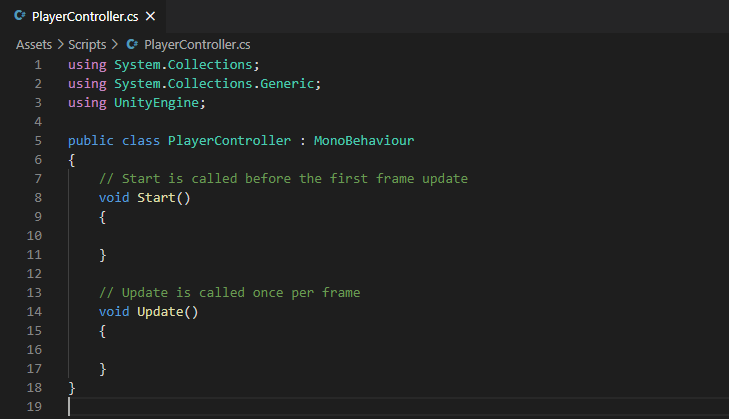
In this code snippet Start & Update are functions. A function/method in C# is a way of packaging code, that contains a series of statements. The function Start is used when our game start, but the function Update is called in every frame.
Our first script to move the Player as follow, and name it as PlayerController.cs. After declaring the necessary variables, the Start function help us to get the relevant rigid body components. In the next OnMove function helps us to get the 2D vector component locally. And finally the FixedUpdate helps us to apply the laws of physics to the rigid body.

Now time to test the Player on the ground. Please make sure the PlayerController.cs is added GameObject Player. And in the inspector panel, make sure under the Player Input, InputAction is selected.

The following video shows the behavior of the Player on the surface.
Now let us set a camera position and write a script to follow the Player. Select the Main Camera from the Hierarchy and drag & drop under the Player Sphere. Now the Main Camera is a child object of the Player. Meaning, the camera will follow the path of the Player. Let's set the Main Camera position to X = 0, Y=10, and Z = -10 and rotate the Main Camera for a preferred rotation. In my case I set to X = 45 and the rest to zero. But this setup is not good!! Because, if the Player Sphere Start to roll, the Main Camera will get the same rotational motion!! This will create a crazy dynamics. :(
So how do we fix this issue?
Well instead of set the Main Camera as a child of the Player, we will create a script, in which we will setup a small offset position between the Player Sphere & the Main Camera. Let's create a new script under the Script folder. Name it as "CameraController". We defined the offset as Vector3 to pass 3D positions and directions around. So the offset is nothing but a difference in the Main Camera & the Player position. Note that here we use LateUpdate function!! This will run after all the other updates are done.
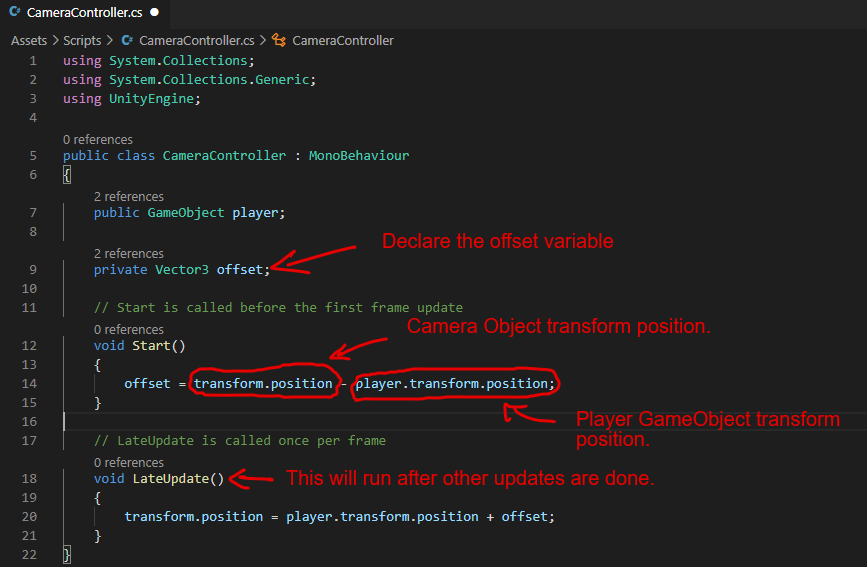
Cool ;). Now the Main Camera follows the Sphere.
Okay now let us set up walls around our terrain. Create an empty GameObject called "Walls" and reset the position. We will put the rest of the four walls under this empty GameObject. Now create a cube and make it a child of Walls. I set the scale of the wall to X=20, Y=2.5, and Z = 1. Similarly, make the other four walls. Create a folder in Assets called MaterialColor, and create the color of choice for the walls and other objects in the game.
The following figure shows the color of my choices in the game.

Now let us create some collectible objects and name it PickUp. We will set the parameters for the collectibles as follow.
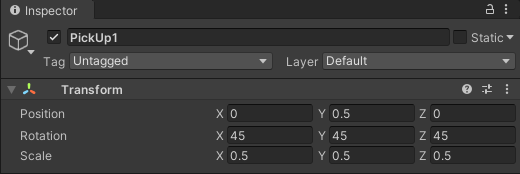
The created Pickup is static, so let us add some flavor of rotation and oscillation to our PickUps. In this tutorial, I have created two different colors of cube, in which green is rotating and the yellow is oscillating. The scripts of the rotation and the oscillation as follow. The rotation script is like below. It rotates 15 degree around X-axis, 30 degree around Y-axis and the 45 degree around the Z-axis.
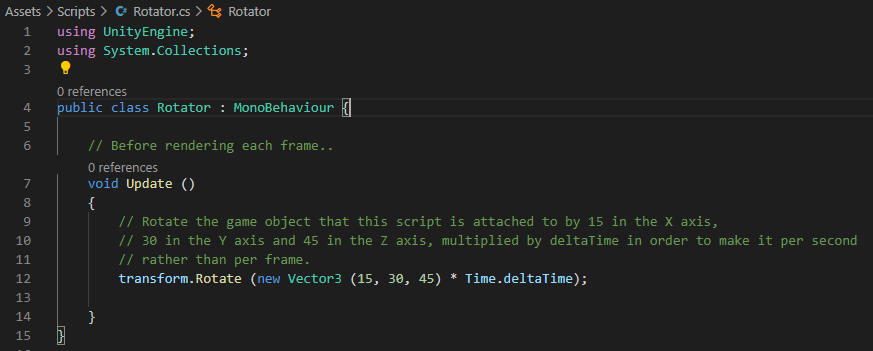
In the oscillation script, we use sine function to observe a sinusoidal behavior. Hence, the equation becomes, float t = (Mathf.Sin (Time.time * speed * Mathf.PI * 2.0f) + 1.0f) / 2.0f. Here t is the Value used to interpolate between a and b.
And the Vector3.Lerp provides Linearly interpolates between two points.

Now how do we detect collisions with PickUps? Well, to detect the collision between the Player GameObject the PickUps GameObjects, we will add a function to our PlayerController.cs. Our purpose is not to destroy the PickUps, but simply to make disappear. Select the PickUpGreenParents, and in the inspector panel use the appropriate tag. If the tag is not available, make sure to create one with the same name. And similarly do for the PickUpYellowParents. Moreover, make sure we also apply rigid body component to the PickUp objects. Untick the gravity and enable "Is Kinematic".
The following lines of code is added to the PlayerController.cs.

The above lines of code simply compare the Tags and deactivate the GameObject.
IMPORTANT: DONT FORGET TO GIVE A TICK TO THE "IS TRIGGER" IN THE INSPECTOR PANEL. Otherwise, it wont work.
The following video shows how things work ;)
Let us count the number of collectible objects and maintain a score based on the color of the object. Let's modify the above OnTriggerEnter function a bit. Whenever a green object is picked up, we increase the score by +1, if a yellow object is touched, we increase the score by -1 (decrease).
Now we create a UI text element to display the score in our game. Go to Hierarchy > UI > Text-TextMeshPro. A TMP importer window will popup. Just import TMP import essentials. Change the New Text with a preferred name as you want and set the location of the text. In this case, we will set the location to the left-hand upper corner.

We will add another function to our PlayerController.

Now select the Player GameObject and drag & drop the CountText GameObject into the PlayerController script. Do the same for the WinText. The complete code for this game can be found here.
Now let's play the game ;-)
References:

Comments