
Introduction to the MRTK (Part-2)
Updated: Jan 28, 2021
Creating a dynamic menu that follows the user:
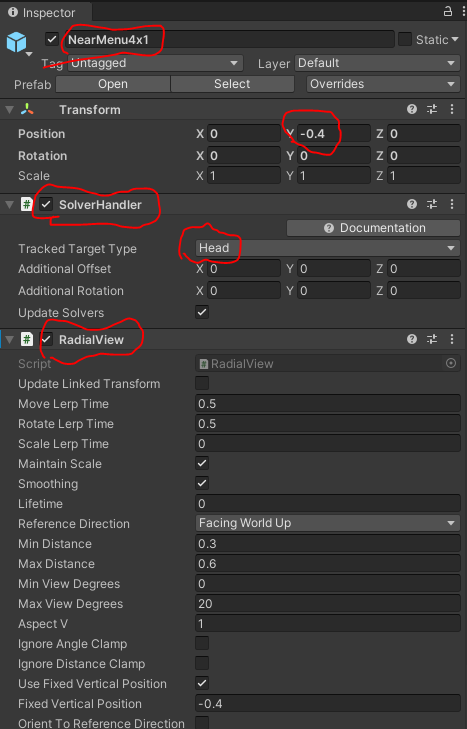
Go to the Assets > MRTK > SDK > Features > UX > Prefabs > Menus folder, drag the NearMenu4x1 prefab into the Hierarchy window. Make sure the following are set in the Inspector windows;
Now lets rename the first button in the ButtonCollection to Indicator. In the Inspector window, configure the Button.

While the Indicator button is active in the Hierarchy window, in the Inspector go to Button Config Helper script, make sure the following things are set.

If you want to disable the chevron Indicator object in the Hierarchy window, you can simply uncheck the checkbox next to its name. Also make sure to add the Directional Indicator Controller (Script) component.

Now let's rename the 2nd button to TapToPlace. Do the following;
- Rename, assign RoverAssembly to None. In the No Function dropdown, select TapToPlace > bool Enabled, argument checkbox is checked and finally, select 'hand with ray'.

Adding text to the scene:
In the Hierarchy window, right-click on the Table object and select 3D Object > Text - TextMeshPro

Now in the Inspector window, configure the Rect Transform as follow;

Change the TextMeshPro - Text component like below
Change Text to Rover Explorer
Change Font Style to Bold
Change Font Size to 1

Change Extra Settings > Margins to 0.03
Adding tooltips:
In the Project window go to the Assets > MRTK > SDK > Features > UX > Prefabs > ToolTip folder to locate the tooltip prefabs:
Expand the RoverParts in the Hierarchy windows and select all its child rover part objects. In the Inspector window, use the Add Component button to add the ToolTipSpawner component and make sure the following configurations are set;

<--drag & drop Simple Line ToolTip prefab
Now go to RoverParts > Camera_Part, and configure the ToolTipSpawner component. ie. Replace Tool Tip Text to reflect the name of the part (Camera). Similarly change the rest of the parts to Generator, Lights, UHF Antenna & Spectrometer.
Interacting with 3D objects:
Now go to RoverExplorer > RoverParts object and select all its child rover part objects. Click Add Component buttons, and add the following;
Object Manipulator (Script) component
NearInteractionGrabbable component
Part Assembly Controller (Script) component
From Two Handed Manipulation Type dropdown, make sure only the Move and Rotate is enabled.

Go to the Assets > MRTK > StandardAssets > Audio. Assign the MRTK_Scale_Start audio clip to the AudioClip field. Make sure to uncheck the Play On Awake. Finally change Spatial Blend to 1.

Expand the RoverAssembly > RoverModel_PlacementHints_XRay > Parts_PlacementHints
then select Camera_PlacementHint. Go to Camera_Part & configure the Part Assembly Controller. Just drag & drop the Camera_PlacementHint like below;

Repeat this step for the rest of the rover part objects.
Generator_Part ---> Generator_PlacementHint
Lights_Part ----> Lights_PlacementHint UHFAntenna_Part ---- > UHFAntenna_PlacementHint
Spectrometer_Part ---> Spectrometer_PlacementHint

References:


Comments