
LAB homework-1
Updated: Oct 30, 2020
LAB-A
I like the simplicity of WIX to built a website. It is very user friendly, and has a cool interface. WIX offers an easy drag-and-drop features to a small websites and blogs. It has more than 100s of free templates available.
Creating a website is very straight forward.
To sign up for a free account:
1.Go to wix.com
2. In the top right corner, click Sign In.

3. From the Sign In screen, choose if you would like to use your social account or create a new account.

4. To sign up type your email ID as a user name and choose a password of your choice.
Once you have singed up, you can choose your favorite template. It offers 100s of templates for different categories, such as for business sites, wedding sites, educational website etc.
Prior to selecting a template, you can provide other information, such as the purpose of the site, your favorite style etc.
Thats it!! You are good to go :))
LAB-B
Unity Setup:
Unity is a cross-platform game engine, written in C++, C# (scripting API), developed by Unity Technologies. It is used to develop video games for web plugins, desktop and mobile devices.
A typical interface of Unity as follow;
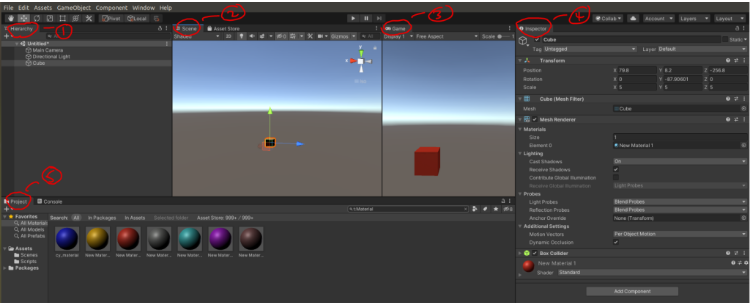
The Hierarchy Window: It helps to see a hierarchical representation of available object in the scene. This shows how the objects in the scene are get attached to each other. If the entire scene is being treated as a parent object, then the objects added under it becomes the child object. This process is known as parenting the in Unity.
The Scene View: This helps to visualize, navigate and edit scene. We have option to choose 2D as well as 3D views.
The Game View: This view helps the developers to view the actual game view, rendered from the camera angle in the game. This is useful to view how the actual game will look like.
The Inspector Window: This is useful for you to edit, inspect and analyze all the properties of the object in a scene. As objects might have different properties, this window helps to set necessary parameters according to our need. Or the inspector window also help us to reveal all the available information about the asset.
The Project Window: In this area you can find the available assets or library of assets that are available for your use for the implementation of the project, i.e, images, music files and other additional files.
Installation of Unity in Ubuntu 18.04.5 LTS
First of all visit the https://store.unity.com/ and choose student version under the tag Plans and pricing and follow the instruction. You will be granted a “Unity Student” plan member if you justify your student membership from an educational establishment.
Here how to get started!
Download the Unity Editor
Assign your subscription seat
Checkout your Student Asset Pack and click “Get your free bundle” to redeem.
Follow the instruction and enter the student coupon code. something like M7MX…. (20 characters in length) into the field “Enter Coupon/Credit Code”
Now do the following;
Download the UnityHub.AppImage file in your download directory.
Navigate to the downloads directory using, cd ~/Downloads
Make it executable by giving the command, chmod a+x UnityHub.AppImage
Execute it by the giving the command in the terminal window, ./UnityHub.AppImage
Since I have already started the project, you can click “New Unity Project” or click the “NEW” to create a new project.

If you click NEW, you will be prompt to the following page. In which you can specify the name of the project, location and templates of the project.

Let's create objects in the Unity.
The process is very simple. Just go to the + sign near Hierarchy and click 3D Objects and then choose whatever the shapes you want to place in the environment. In my case, I choose a cube. Note that the coordinate of the cube is (0,0,0) when you create and the scale of the object is 1. It is interesting to note that here that the 1 Unity scale is equivalent to 1m in the real world.

Now we can scale the object as we want (make it bigger/smaller), or change the coordinate of the object (shift the object to a different location).
Right click on Assets > Create > Material if you want to give an eye catching color to our cube. After choosing the material, you can specify the color in the inspector panel.

Now lets try something interesting. Create a falling sphere in the Unity.
Create a terrain surface (earth). Make sure the Box Collider is ticked.
Create a sphere. Give your favorite color to the sphere. And in the bottom of the Inspector panel, select Rigidbody from Add Component. Make sure to tick the Use Gravity if the problem is dynamics (under the influence of gravity).
Now click the play button from the tool bar

The sphere falls to the ground and immediately will come to rest (don’t expect the bouncing nature of the ball).
If you want to create a bouncing ball, Right click on Assets > Create > Physics Material. In the Physics Material, choose bounciness to 0.85 for example. Bounciness coefficient is maximum 1 and minimum 0. And note that the static friction always must be equal or greater than the dynamic friction. You can choose Friction, Bounce combine as you prefer. Apply the selected Physics Material to the terrain surface. This can be done simple drag and drop the Physics Material in the created terrain. Click the link to see the bouncing ball.
In the Hierarchy panel, you can right click and choose Create Empty. Now rename (GameEnv-1) it and put the created terrain and the other objects in it. Now GameEnv-1 will act as parent and the other object in it are the children.
You can follow the same procedure if you want to make a cylinder that rolls along an inclined surface. I have chosen the same surface characteristic for the inclined plane as well. Click the link to see the rolling cylinder along the inclined surface.
Reference:
-
-
-

Comments